What is Probes in k8s.
Kubernetes provides probes (health checks) to monitor and
act on the state of Pods (Containers) and to make sure only healthy Pods serve
traffic. With the help of probes, we can control when a pod should be started,
ready for service, or running to serve traffic.
The probe is used to detect:
1. Containers which are yet to start and so can't take
traffic.
2. Containers which are overloaded and can't take any more
traffic.
3. Containers which are dead and need a reboot, that might
help in reviving the container
How Probes Work.
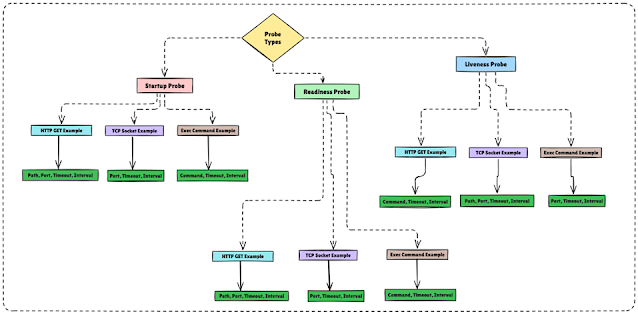
Probes are configured in the pod specification and can use
one of the following mechanisms to check the container's health:
- HTTP
GET Request:
- Kubernetes
sends an HTTP GET request to a specified endpoint (e.g., /health) on
the container's IP address.
- If
the response code is between 200 and 399, the probe is considered
successful.
- TCP
Socket Check:
- Kubernetes
attempts to establish a TCP connection to a specified port on the
container.
- If
the connection is successful, the probe passes.
- Exec
Command:
- Kubernetes
executes a command inside the container.
- If
the command exits with a status code of 0, the probe passes.
Configuration Options for Probes.
When defining a probe, you can configure the following
parameters:
- initialDelaySeconds:
The number of seconds to wait before starting the probe after the
container starts.
- periodSeconds:
How often (in seconds) to perform the probe.
- timeoutSeconds:
The number of seconds after which the probe times out.
- successThreshold:
The number of consecutive successes required to consider the probe
successful.
- failureThreshold: The number of consecutive failures required to consider the probe failed.
Three types of probe.
Startup Probe à Readiness Probe à Liveness Probe
1.Startup Probe.

i) Startup probe only checks if the container has started or
not.
ii)The startup probe checks the container, and if it passes,
then Kubernetes traffic will start. If the startup probe fails, the startup
probe restarts the container inside the pod, not restarts the pod.
iii)The startup probe will check only once when the
container starts.
iv)The container starts properly and then if the container
stops, the startup probe will not start.
Scenario :- If
the html file is not found, the container will be restarted every 10 seconds.
# vim deploy-startup.yaml
apiVersion: apps/v1
kind: Deployment
metadata:
name: startup
spec:
replicas: 3
selector:
matchLabels:
app: readiness
template:
metadata:
labels:
app: readiness
spec:
containers:
- name: nginx
image:
lovelearnlinux/webserver:v1
ports:
-
containerPort: 80
startupProbe:
exec:
command:
- cat
- /var/www/html/index.html1we
initialDelaySeconds: 5 # Wait before first check
periodSeconds: 10 # Check every 10 sec
failureThreshold: 3 # Restart if it fails 3 times
# kubectl get pods

The Container will be restarted.
# kubectl describe pods startup-d578d8c9-ctljv

#kubectl expose deployment startup --name startup-svc

########################################
2.Readiness Probe.

1. Readiness probe will continuously check the container to
see if the container is ready or not.
2. If the readiness probe fails, Kubernetes will stop traffic
to the container until the probe passes.
Why would the app not be ready ?
1.It is overloaded.
2.It might need to do some housekeeping or cleanup.
3.Some of its dependencies(A cache, a database, etc)are not working or are unreachable.
Scenario :-
First, check the startup probe; after that, check the
readiness probe.
If the HTML file is deleted from the running container, the
container IP will be removed from the service after 20 seconds, and
traffic will not go to the container.
# vim deploy-readiness.yaml
apiVersion: apps/v1
kind: Deployment
metadata:
name: readiness
spec:
replicas: 3
selector:
matchLabels:
app: readiness
template:
metadata:
labels:
app: readiness
spec:
containers:
- name: nginx
image:
lovelearnlinux/webserver:v1
ports:
-
containerPort: 80
startupProbe:
exec:
command:
- cat
- /var/www/html/index.html
initialDelaySeconds: 5 # Wait before first check
periodSeconds: 10 # Check every 10 sec
failureThreshold: 3 # Restart if it fails 3 times
readinessProbe:
exec:
command:
- cat
- /var/www/html/index.html
initialDelaySeconds: 5 #
Wait before first check
periodSeconds: 10 # Check every 10 sec
timeoutSeconds: 4 # How
long will you wait for the response.
failureThreshold: 2 # How many times will the fail response check.
successThreshold: 1 # One
success needed to mark as Ready
Note:-
timeoutSeconds: 4 # Timeout should be less than
periodSeconds, & How long will you wait for the response?
# kubectl get pods -o
wide

# kubectl describe pods readiness-6d4c8fd8d5-8s5n
# kubectl expose deployment readiness --name readiness-svc
# kubectl get svc

# kubectl describe svc readiness-svc

# curl http://10.103.147.81

#

# kubectl get pods -o wide

# kubectl describe pods readiness-6d4c8fd8d5-8s5n9

# kubectl get svc

Only two IP showing in the services.
# kubectl describe svc readiness-svc

#######################
3.Liveness Probe.

Liveness probe will work same as readiness probe, it will
continue checking the container, if it fails then it will restart the container
after 40 seconds but will not restart the pod.
# vim deploy-liveness.yaml
apiVersion: apps/v1
kind: Deployment
metadata:
name: liveness
spec:
replicas: 3
selector:
matchLabels:
app: liveness
template:
metadata:
labels:
app: liveness
spec:
containers:
- name: nginx
image:
lovelearnlinux/webserver:v1
ports:
-
containerPort: 80
startupProbe:
exec:
command:
- cat
-
/var/www/html/index.html
initialDelaySeconds: 5 # Wait
before first check
periodSeconds: 10 # Check
every 10 sec
failureThreshold: 3 # Restart
if it fails 3 times
readinessProbe:
exec:
command:
- cat
-
/var/www/html/index.html
initialDelaySeconds: 5 # Wait
before first check
periodSeconds: 10 # Check every
10 sec
timeoutSeconds: 4 # How long to
wait for the response
failureThreshold: 2 # (10x2=20
sec) Restart after 2 failures
successThreshold: 1 # One success
needed to mark as Ready
livenessProbe:
exec:
command:
- cat
-
/var/www/html/index.html
initialDelaySeconds: 5 # Wait before first check
periodSeconds: 10 # Check every 10 sec
timeoutSeconds: 4 # How long to wait for the response
failureThreshold: 6 # (10x6=60 sec) Restart after 6 failures
successThreshold: 1 # One success needed to mark as Ready
# kubectl apply -f deploy-liveness.yam
# kubectl get pods
# kubectl get deployment

# kubectl expose deployment liveness --name liveness-svc
# kubectl get svc

# kubectl describe svc liveness-svc

# kubectl exec -it <pod_name>
--
/bin/bash
# kubectl exec -it
liveness-cf4f64d67-bhk8b --
/bin/bash
# rm -rf /var/www/html/index.html
# kubectl describe svc liveness-svc

# kubectl describe
pods <pod_name>

# kubectl get pods

No comments:
Post a Comment