Release:
RedHat Enterprise Linux 5
Windows Enterprise Server 2003 R2
Assumption:
Domain Name : EXAMPLE.COM
AD Server IP Address : 192.168.1.60
AD Server Hostname : SHASHI
Linux Client IP Address :
192.168.1.26
Linux Clinet Hostname : CLIENT
1).Install the required RPMs
# yum install krb5-libs
pam_krb5 krb5-workstation samba-common samba-client
2)
Add the domain server entry in the host file
# vi /etc/hosts
192.168.1.60
shashi.example.com shashi
192.168.1.26
client.example.com client
3)
Mention the name server ipaddress in the resolv.conf file
# vi /etc/resolv.conf
nameserver
192.168.1.60
Configure Kerberos for AD
Integration:
4)
Modify the /etc/krb5.conf file, to enable the Domain
controller authentication in Linux.
# vi /etc/krb5.conf
[logging]
default =
FILE:/var/log/krb5libs.log
kdc =
FILE:/var/log/krb5kdc.log
admin_server =
FILE:/var/log/kadmind.log
[libdefaults]
default_realm =
SHASHI.EXAMPLE.COM
dns_lookup_realm =
true
dns_lookup_kdc =
true
[realms]
EXAMPLE.COM
= {
kdc =
shashi.example.com
admin_server =
shashi.example.com:749
default_domain =
example.com
}
[domain_realm]
.testdom.com =
EXAMPLE.COM
testdom.com =
EXAMPLE.COM
[kdc]
profile =
/var/kerberos/krb5kdc/kdc.conf
[appdefaults]
pam = {
debug = false
ticket_lifetime
= 36000
renew_lifetime
= 36000
forwardable =
true
krb4_convert
= false
}
5)
PAM needs to be configured to use Active Directory
authentication. Edit the system-auth file like below
# vi
/etc/pam.d/system-auth
auth
required pam_env.so
auth
sufficient pam_unix.so nullok try_first_pass
auth
requisite pam_succeed_if.so uid >= 500 quiet
auth
sufficient pam_winbind.so use_first_pass
auth
required pam_deny.so
account
required pam_unix.so broken_shadow
account
sufficient pam_succeed_if.so uid < 500 quiet
account
[default=bad success=ok user_unknown=ignore] pam_winbind.so
account
required pam_permit.so
password
requisite pam_cracklib.so try_first_pass
retry=3
password
sufficient pam_unix.so md5 shadow nullok
try_first_pass use_authtok
password
sufficient pam_winbind.so use_authtok
password
required pam_deny.so
session
optional pam_keyinit.so revoke
session
optional pam_mkhomedir.so
skel=/etc/skel/ umask=0077
session
required pam_limits.so
session
[success=1 default=ignore] pam_succeed_if.so service in crond quiet
use_uid
session
required pam_unix.so
Create
Users and Group from DC:
6)
Add the below entries in /etc/samba/smb.conf file, will cause
the winbind service to enumerate users and groups from the domain
controller.
#
vi /etc/samba/smb.conf
workgroup
= EXAMPLE
password
server = shashi.example.com
server
string = Samba Server Version %v
realm
= EXAMPLE.COM
security
= ads
idmap
uid = 16777216-33554431
idmap
gid = 16777216-33554431
winbind
separator = #
winbind
enum groups = yes
winbind
enum users = yes
template
homedir = /home/%U
template
shell = /bin/bash
winbind
use default domain = true
winbind
offline logon = false
Where,
idmap uid -
the range of numeric uid's that winbind will use to enumerate domain
users with on your system. You should select a range that does not
conflict with uid numbers already in use on the system.
idmap gid -
the range of numeric gid's that winbind will use to enumerate domain
groups on your system.
winbind enum groups
and winbind
enum users -
whether winbind should "create" the domain's groups/users
on the system or not.
winbind separator
- the character winbind will use to
separate the domain name from the user or group name The template
homedir statement is used to generate the home directory path for
domain users.
realm -
is used to describe a Kerberos-based security architecture
template homedir = /home/%U
– here %u substituted with the
user's Windows NT user name
template shell = /bin/bash
– login shell for that user
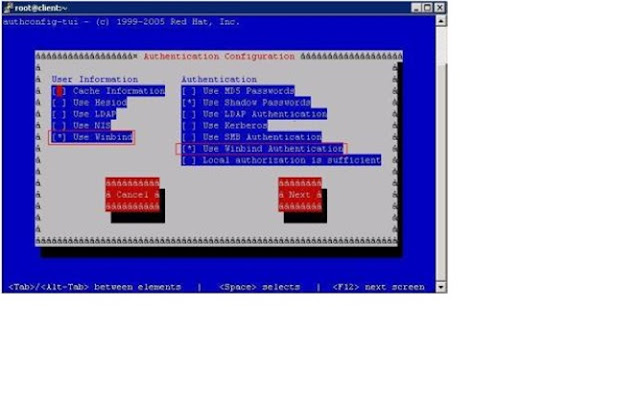
7)
Change the user
information and authentication type to winbind
using the
“authconfig-tui”
command
# authconfig-tui
Then Select “Next”
and Select “ok”.
8)
Restart the winbind service and also configure winbind to
start automatically.
# service winbind restart
# chkconfig --level 35
winbind on
9)
Join the Domain using the below command
# net ads join -U
administrator
10)
To test the enumeration function of the winbind use the below
commands.
# wbinfo –u
# wbinfo –g