1.What is a pod kubernetes ?
Pods is
collection of containers . live together and die together. IP assigned to pod
only. All containers in the same pod will
communicate to localhost with different ports. Pods are the smallest unit that
can be deployed and managed by Kubernetes.
Each Pod has its unique IP Address and ports within
the cluster.
Any data saved inside the Pod will disappear without
a persistent storage.
Pods
create flow diagram :-
2.Pause :
2.Pause : First pause container is
created after that the pods is created. Pause container is IP assigned to pods.
Pause container that works with pods but will not be visible in pods. The
input and output traffic of all the containers running in a pod will go through
the Puase container.
3.How many pause container is running on k8s cluster.
# ctr -n k8s.io c ls
4.How many pause container is running on woker side.
on woker01
on woker02
5.Pod lifecycle:
#
kubectl get pods
NAME
READY STATUS RESTARTS AGE
nginxpod
2/2
Running 0
4m25s
NAME :- Pod name
READY 2/2 :- <running
status of container>/<total of container in pod>
STATUS :- status
of pod.
RESTARTS :- restart count.
AGE
:- running status time.
|
CrashLoopBackOff
|
CrashLoopBackOff is
a Kubernetes state that indicates a restart loop is happening in a pod. We
have to check by describing pod.
|
6.Container States:
The way Kubernetes maintain Pod
phases, it maintains state of each container in the Pod.
Once the scheduler assigns a Pod to a Node, the kubelet starts creating
containers for that Pod using a container runtime. There are 3 possible states
for the container.
Types of Pod:
i)
Single Container pods.
ii)
Multi Container Pods.
Single Container pods :-
If you need to run a single
container in Kubernetes, then you have to create a pod for it which is nothing
but Single Container Pod. One
or more containers running in single pod and one container as a helper container.
Multi Container pods :-
If you have to run two or more
containers in a pod, then the pod created to place these containers is called a
Multi Container Pod.
There are three common
design patterns for multiple containers into a single pod.
i) Sidecar
ii) Adapter
iii) Ambassador
i) What is Kubernetes Sidecar?
Some great examples are using a sidecar for
monitoring and logging and adding an agent for these purposes.
one of the pod will contain primary application
while the second pod would contain sidecar container. The main application will
write the logs into a log file, and the sidecar container will continuously
read this log file and send the output to STDOUT. Now you may configure some
logging agent to send these logs to a central log server.
# cat sidecar-pod.yaml
apiVersion: v1
kind: Pod
metadata:
name: sidecar-pod
spec:
volumes:
-
name: log
emptyDir: {}
containers:
-
image: busybox
name: application
command: ['sh', '-c', 'while true; do echo Today Date and Time is
$(date) INFO Hello world..! >> /var/log/myapp.log && sleep 5;
done']
volumeMounts:
-
name: log
mountPath: /var/log
- name: sidecar
image: busybox
command: ['sh', '-c', 'tail -fn+1 /var/log/myapp.log']
volumeMounts:
-
name: log
mountPath: /var/log
# kubectl apply -f sidecar-pod.yaml
#
kubectl get pods
How many container available
in pods.
# kubectl
get pod
-o="custom-columns=NAME:.metadata.name,INIT-CONTAINERS:.spec.initContainers[*].name,CONTAINERS:.spec.containers[*].name"
or
# kubectl
get pods <pods_name> -o jsonpath='{.spec.containers[*].name}'
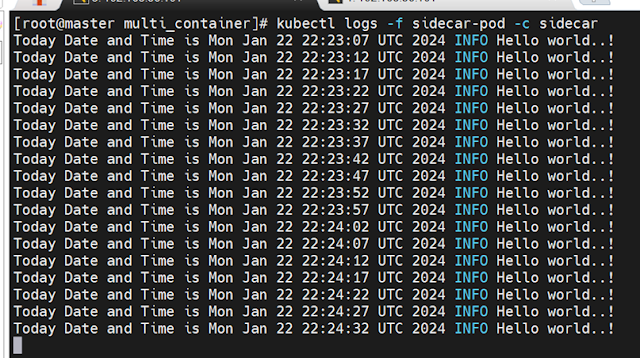
# kubectl logs -f sidecar-pod -c
sidecar
ii)
What is Adapter in kubernetes.
For example, you’re running multiple
applications within separate containers, but every application has a different
way of outputting log files.
Now, you have a centralized logging system
that accepts logs in a particular format only. What can you do in such a
situation? Well, you can either change the source code of each application to
output a standard log format or use an adapter to standardize the logs before
sending it to your central server. That’s where the adapter pattern comes in.
use
case
let’s consider that an application
that outputs logs in a particular format, that we want to change to something
standard.
# vim adaptor.yaml
apiVersion: v1
kind: Pod
metadata:
name: adapter-pod
labels:
app: adapter-app
spec:
volumes:
-
name: logs
emptyDir: {}
containers:
- name:
app-container
image: alpine
command: ["/bin/sh"]
args:
["-c", "while true; do date >> /var/log/app.log; sleep
2;done"]
volumeMounts:
-
name: logs
mountPath:
/var/log
- name:
log-adapter
image: alpine
command: ["/bin/sh"]
args:
["-c", "tail -f /var/log/app.log|sed -e 's/^/Date /' >
/var/log/out.log"]
volumeMounts:
-
name: logs
mountPath:
/var/log
In the manifest, we have an app-container
that outputs a stream of dates to a log file. The log-adapter container adds a
Date prefix in front. Yes, it’s a very rudimentary example, but enough to get
how the adapter works.
# kubectl apply -f adaptor.yaml
# kubectl
get pods
# kubectl exec -it adapter-pod -c
app-container /bin/sh
# ps -elf | grep "date"
# cd /var/log
# cat app.log
# kubectl exec -it adapter-pod -c log-adapter /bin/sh
iii) What is Ambassador ?
If you look carefully in the manifest YAML,
you will find there are three containers. The app-container-poller continuously
calls http://localhost:81 and sends the content to
/usr/share/nginx/html/index.html.
The app-container-server runs nginx
and listens on port 80 to handle external requests. Both these containers share
a common mountPath. That is similar to the sidecar approach.
There is an ambassador-container running within the pod that listens on
localhost:81 and proxies the connection to example.com, so when we curl the
app-container-server endpoint on port 80, we get a response from example.com.
# cat ambassador.yaml
apiVersion: v1
kind: Pod
metadata:
name: ambassador-pod
labels:
app: ambassador-app
spec:
volumes:
-
name: shared
emptyDir: {}
containers:
- name:
app-container-poller
image: yauritux/busybox-curl
command: ["/bin/sh"]
args: ["-c", "while true; do curl 127.0.0.1:81 > /usr/share/nginx/html/index.html;
sleep 10; done"]
volumeMounts:
-
name: shared
mountPath: /usr/share/nginx/html
- name:
app-container-server
image: nginx
ports:
- containerPort: 80
volumeMounts:
-
name: shared
mountPath: /usr/share/nginx/html
- name:
ambassador-container
image: bharamicrosystems/nginx-forward-proxy
ports:
- containerPort: 81
How
to check container name in pods
# kubectl describe pods <pods_name>
How
to check particular container log from pods.
# kubectl logs <pod_name>
<container_name>
# kubectl get pods
# kubectl port-forward
ambassador-pod 80:80
# curl localhost
Init Containers:
In
Kubernetes, an init container is the one that starts and executes before other
containers in the same Pod. Used to perform small tasks. If the task is
completed after that container will exit.
specialized containers that run before
app containers in a Pod. Init containers can contain utilities or setup
scripts not present in an app image. You can specify init containers in the Pod
specification alongside the containers array (which describes app containers).
The init-container pod will clone from the git web-content directory
and the code will be downloaded. The logical name of the web-content
directory is web-content-dir, after that the nginx pod will mount from
the web-content-dir directory.
# cat init-container-pod.yaml
apiVersion: v1
kind: Pod
metadata:
name:
init-container-demo
spec:
containers:
- name:
nginx
image:
nginx:alpine
ports:
-
containerPort: 80
volumeMounts:
-
name: web-content-dir
mountPath: /usr/share/nginx/html
initContainers:
- name:
helper
image:
alpine/git
command:
- git
-
clone
- https://github.com/Praqma/simple-website.git
-
/web-content/
volumeMounts:
-
name: web-content-dir
mountPath: "/web-content"
volumes:
- name:
web-content-dir
emptyDir: {}
# kubectl describe pods init-container-demo
# kubectl apply -f init-container-pod.yaml
# kubectl get pods -w
# kubectl get pod
-o="custom-columns=NAME:.metadata.name,INIT-CONTAINERS:.spec.initContainername,CONTAINERS:.spec.containers[*].name"
Worker
node side image download :- nginx pods
delete hota hai to nginx image remove nhi hoti hai.
# ctr -n k8s.io c ls
# kubectl get pods -o wide
#
curl -l 10.244.1.9
Ephemeral Containers :-
Ephemeral Containers are a feature
in Kubernetes that allows users to run diagnostic or debugging containers
within an existing Pod for a short duration. These containers are temporary and
serve the purpose of troubleshooting, inspecting, or debugging issues within
the context of a running Pod.
Diagnostic and Debugging Tools:
Same Network Namespace:
Same Storage Volumes:
No Impact on Application
Containers:
Access to Pod Namespace:
# kubectl alpha debug -it <pod-name>
--image=<debugger-image:tag>
Static Pods in Kubernetes :-
Static pods in Kubernetes are
created and managed directly by the kubelet service on a node, without the need
for a Kubernetes API server or scheduler. Kubelet can only create and manage static pods.
For example, kubeadm uses static pods to bring up Kubernetes control plane components like api-server, and controller-manager as static pods on the Master Node.
some pods running in the
kube-system namespace are static pods on the master node.
Kubelet config file path :-
# vim /var/lib/kubelet/config.yaml
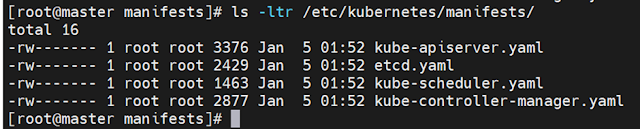
Static pods path :-
These yaml files are running as a static
pods.
# ls -ltr /etc/kubernetes/manifests/
Creating a static pods on master node
:-
# vim static_pods.yaml
apiVersion: v1
kind: Pod
metadata:
name: static-web
labels:
role: myrole
spec:
containers:
- name: web
image: nginx
ports:
- name: web
containerPort: 80
protocol: TCP
# cp -rvf static_pods.yaml /etc/kubernetes/manifests
# kubectl get
pods
When deleting static_pods.yaml
file static pods are removed.
# rm -rf /etc/kubernetes/manifests/static_pods.yaml
# kubectl get
pods
On worker node :-
# cp -rvf static_pods.yaml /etc/kubernetes/manifests
# kubectl get
pods
# kubectl describe pods static-web-worker01
command :-
# kubectl run
<pod_name> --image=<image_name>
# kubectl get pods (show all pods)
# kubectl run nginx --image=nginx
# kubectl describe pods <pods_name> (describe for pods)
# kubectl get pods --show-labels
# kubectl get pods -w (watch command)
# kubectl get po -o wide (which node, pod is working)
# kubectl delete pod <pod_name>
# kubectl delete pods --all (delete all pods)
# kubectl get pods <pod_name> (How many container are running
in pod.)
# kubectl edit pod <pod_name> (edit pod file
update and changes.)
# kubectl explain pod --recursive | less (help for
create yaml file)
# kubectl get pods --all-namespaces
Kubernetes system namespaces use :- kube-system
New Pods default namespaces use :- default
# kubectl get pods -n <namespaces> (show pods only namespace)
# kubectl explain pod ( help for yaml file parami)
# kubectl exec <pod_name> -c
<container_name> -it bash (login container)
# kubectl describe pods nginx (check debug pods and containers)
# kubectl logs nginxpod -c rediscontainer (check logs for
container)
# kubectl exec <pod_name> date (execute date command)
# kubectl exec <pod_name> -c <container-name>
date (execute date command in single container)
# kubectl logs <pod_name> (check logs for pods)
# kubectl logs -f
<pods_name> -c <container_name> (check logs for container)
# kubectl get pod
-o="custom-columns=NAME:.metadata.name,INIT-CONTAINERS:.spec.initContainers[*].name,CONTAINERS:.spec.containers[*].name"
(check container in pods)
# kubectl get pods
<pods_name> -o jsonpath='{.spec.containers[*].name}' (check container in
pods)
# kubectl exec -it
<pods_name> -c <container_name> -- cat /etc/hostname (check hostname
container)
# kubectl exec -it
<pods_name> -c <container_name> -- ifconfig eth0 (check ip container)
Check yaml file (create and apply is same command)
# kubectl create -f first_pod.yaml --dry-run=client
# kubectl apply -f first_pod.yaml --dry-run=client
How to create yaml
file ?
# kubectl explain
pods
# kubectl explain pod --recursive
| less
Example for help
create pod yaml file
# kubectl run nginx
--dry-run=client --image=nginx -o yaml
|
1.
|
Pause container
|
Pause container is IP assigned to pods.
|
|
2.
|
Single pods
|
Single pods contain a single container.
|
|
3.
|
Multi pods
|
run two or more containers in a pod is called multi pods.
|
|
4.
|
Side car pods
|
sidecar for monitoring and logging and adding an agent for these
purposes.
|
|
5.
|
Adapter pods
|
centralized logging system that accepts logs in a particular format
only.
|
|
6.
|
Ambassador pods
|
Ambassador is a Kubernetes-native API Gateway built on Envoy Proxy.
Managed entirely via Kubernetes Custom Resource Definitions, Ambassador
provides powerful capabilities for traffic management, authentication, and
observability.
Proxy database connection
|
|
7.
|
Staic pods
|
Static pods are managed directly by the kubelet on a specific node
and are not part of the Kubernetes control plane.
|
|
8.
|
Init container
|
Init containers are containers that run and complete before the main
application containers start.
|
|
9.
|
Ephemeral Contaoners
|
Ephemeral Containers are a feature in Kubernetes that allows users to
run diagnostic or debugging containers within an existing Pod for a short
duration.
|