Introduction:
WebDAV stands for "Web-based Distributed Authoring and Versioning". It
is a set of extensions to the HTTP protocol which allows users to
collaboratively edit and manage files on remote web servers.
Problem:
Need to enable the webdav (Web-based Distributed Authoring and Versioning) in apache web server.
Solution:
1) Install the required rpms
# yum install httpd
2) Enable the webdav related modules in the httpd,conf file
# vi /etc/httpd/conf/httpd.conf
LoadModule dav_module modules/mod_dav.so
LoadModule dav_fs_module modules/mod_dav_fs.so
3) Create a directory to publish over web server
# mkdir /var/www/webdav
4) Create one new configuration file for the webdav
# vi /etc/httpd/conf.d/webdav.conf
<IfModule mod_dav.c>
LimitXMLRequestBody 131072
Alias /webdav "/var/www/webdav"
<Directory /var/www/webdav>
Dav On
Options +Indexes
IndexOptions FancyIndexing
AddDefaultCharset UTF-8
Order allow,deny
Allow from all
</Directory>
</IfModule>
5) If
want to enable authentication for the webdav means, add the below lines
in the webdav.conf file and also create the user database
# vi /etc/httpd/conf.d/webdav.conf
AuthType Basic
AuthName "WebDAV Server"
AuthUserFile /etc/httpd/webdav.users.db
Require valid-user
6) Create the user database using the below command
# htpasswd -c /etc/httpd/webdav.users.db testuser
7) Restart the httpd service
# service httpd restart
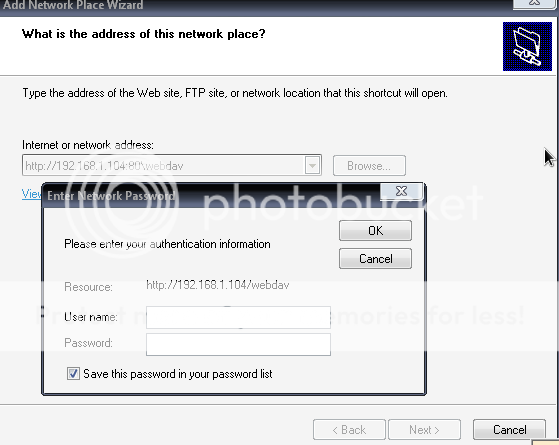
8) Access the webdav from the client using the below URL
http://shashikant/webdav
III-2 Now open the webdab with http://localhost/webdav or with cadaver tool


III-2 Now open the webdab with http://localhost/webdav or with cadaver tool
# cadaver http://localhost/webdav
Authentication required for WebDAV on server `localhost’:
Username: admin
Password:
dav:/webdav/>
Now how to connect from Windows to webdav serverAuthentication required for WebDAV on server `localhost’:
Username: admin
Password:
dav:/webdav/>
To connect from Linux (ubuntu example)
No comments:
Post a Comment