1. What is a NameSpace?

Kubernetes namespaces partition a Kubernetes cluster into
logical isolations. This enables IT teams to organize Kubernetes infrastructure
resources so that various users and teams can collaborate, while maintaining
clear and isolated boundaries.
For example, with Kubernetes namespaces, IT teams can logically isolate development, test and production environments. Namespaces also provide administrative control over resources, via resource quotas and limits.
Note: If you delete the namespace, all resources such
as pods and services will be deleted.
when first sets up a Kubernetes cluster, four namespaces are
automatically created:
# kubectl get ns

1.Default :- All the resource deployments without a
namespace are deployed under this namespace.
2.Kube-system :- This namespace holds Kubernetes system configurations and deployments crucial to the Kubernetes cluster.
3.kube-public :- This namespace is open to all users with read-only access, but reserved for system usage.
4.kube-node-lease :- All nodes have an associated Lease object in this namespace. A Lease boosts the performance of the node heartbeats -- messages that nodes send to the node controller to indicate availability -- as the Kubernetes cluster scales.
How many pods are running in kube-system namespace.
# kubectl get pods -n kube-system

These are the main resources within a namespace.
|
Resource |
Description |
|
Pods |
Running applications (containers) |
|
Deployments |
Manage application replicas |
|
ReplicaSets |
Ensure a specific number of pod replicas are
running |
|
StatefulSets |
Manage stateful applications (e.g., databases) |
|
DaemonSets |
Run a copy of a pod on each node |
|
Jobs |
Run a task once and exit |
|
CronJobs |
Run scheduled tasks (like a cron job) |
|
Services |
Expose applications within or outside the cluster |
|
ConfigMaps |
Store configuration data (key-value pairs) |
|
Secrets |
Store sensitive data securely (passwords, API
keys, etc.) |
|
Ingress |
Manage external access (e.g., via domain names) |
|
NetworkPolicies |
Control pod-to-pod and external traffic |
|
ResourceQuotas |
Limit CPU, memory, and other resource usage |
|
LimitRanges |
Set min/max resource requests for pods |
|
PersistentVolumeClaims (PVCs) |
Request storage for pods |
|
Role & RoleBinding |
RBAC permissions for a specific namespace |
Some
resources in the cluster are not included in the namespace.
|
Cluster-Wide Resources |
Description |
|
Nodes |
Cluster in physical/virtual
machines |
|
PersistentVolumes (PVs) |
Cluster-wide storage resources |
|
ClusterRoles & ClusterRoleBindings |
RBAC permissions across all namespaces |
|
StorageClasses |
Define storage types in the cluster |
1.Which resource supports the namespace.
# kubectl api-resources | less
2.All Pods in All Namespaces.
# kubectl get pods --all-namespaces
3.All Namespaces in the Cluster.
# kubectl get namespaces /ns
4.Details of a Specific Namespace.
# kubectl describe namespaces <namespace_name>
5.How to create namespace.
# kubectl create ns test
6.How to create nginx pod in test namespace.
# kubectl run nginx --image=nginx --port=80 --namespace=test
# kubectl get pods -n test
7.Set default test namespaces
# kubectl config set-context --current --namespace=test
8.Check which name namespace set in cluster.
# kubectl config view
# kubectl config get-contexts
CURRENT NAME CLUSTER AUTHINFO NAMESPACE
* kubernetes-admin@kubernetes kubernetes kubernetes-admin test
9.Delete pods in default namespaces.
# kubectl delete pods <pod_name> -n default
10.Delete namespace
# kubectl delete namespace <name of namespace>
a).Create a Namespace with yaml file.
# cat
namespace.yaml
apiVersion:
v1
kind:
Namespace
metadata:
name: my-namespace
labels:
environment: development
# kubectl
apply -f namespace.yaml
# kubectl get ns my-namespace

b).Create
a Pod in the Namespace.
# vim pod.yaml
apiVersion:
v1
kind: Pod
metadata:
name: my-pod
namespace: my-namespace #
Assign pod to the namespace
labels:
app: my-app
spec:
containers:
- name: nginx-container
image: nginx
ports:
- containerPort: 80
# kubectl
apply -f pod.yaml
# kubectl get pods -n my-namespace -o wide

c).Create
a NodePort Service for the Pod.
# vim service.yaml
apiVersion:
v1
kind:
Service
metadata:
name: my-service
namespace: my-namespace
# Assign service to the namespace
spec:
type: NodePort
selector:
app: my-app # Matches the
pod label
ports:
- protocol: TCP
port: 9090 # Service port
targetPort: 80 # Container port
# kubectl
apply -f service.yaml
# kubectl get svc -n my-namespace

# d) Hit to curl command http://ClusterIP:9090
# curl http://10.111.177.3:9090

Update namespace with pods.
a)Create
New Namespace.
# kubectl
create namespace new-namespace
b)Export
Resources
# kubectl
get all -n old-namespace -o yaml > resources.yaml
c)Modify
Namespace in YAML
# sed -i
's/old-namespace/new-namespace/g' resources.yaml
d)Apply
Resources
kubectl
apply -f resources.yaml
e)Delete Old Namespace
# kubectl
delete namespace old-namespace
Connect Two Different Namespaces in Kubernetes.

a)One pods
is created in namespace “my-namespace”.
# kubectl
get svc -n my-namespace

b)Service is
created in namespace “my-namespace”.
# kubectl
get pods -n my-namespace

c)Create a one
more namespace frontend.
# kubectl
create ns frontend
d) create a
pods in namespace frontend.
# vim frontend-pod.yaml
apiVersion:
v1
kind: Pod
metadata:
name: frontend-pod
namespace: frontend
labels:
app: frontend
spec:
containers:
- name: nginx
image: nginx
# kubectl
get pods -n frontend

e) first to
login in frontend-pod pods.
# kubectl
exec -it frontend-pod -n frontend -- bash
f)Check curl
command from frontend-pod.
Internal DNS
Syntax : servicename.namespace.svc.cluster.local:ServicePort
# curl
http://my-service.my-namespace.svc.cluster.local:9090

1.Configure resource quotas on namespaces.
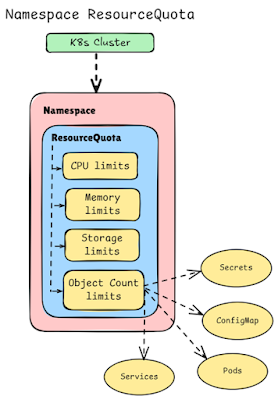
A ResourceQuota in
Kubernetes limits the amount of CPU, memory, storage, and other resources that can
be used in a namespace. A ResourceQuota is used to control and limit resource
consumption within a namespace.
Purpose:
a) a) Prevents one namespace from consuming
all cluster resources.
b) b) Ensures fair resource distribution
across different teams/namespaces.
c) c) Applies at the namespace level, not
individual pods.
1.Create a new namespace.
# kubectl create ns dev-team
2.Set a Resource Quota in a Namespace.
# vim namespace-quota.yaml
apiVersion: v1
kind: ResourceQuota
metadata:
name:
namespace-quota
namespace: dev-team
spec:
hard:
pods: "10" # Max 10 pods in the namespace
requests.cpu: "2" # Total CPU request limit: 2 cores
requests.memory: "4Gi" # Total memory request limit: 4GB
limits.cpu: "4" # Max CPU usage: 4 cores
limits.memory: "8Gi" # Max memory usage: 8GB
a) Kubernetes ensures that at
least requests.cpu: 2 CPU cores and requests.memory: 4GB
RAM are available before scheduling pods.
b) If resources are not available, the
pod will not be scheduled.
a) If a container tries to exceed limits.cpu:
"4", Kubernetes throttles the CPU usage.
b) If a container tries to exceed limits.memory: "8Gi", Kubernetes kills (OOMKill) the pod.
# kubectl apply -f namespace-quota.yaml
# kubectl get resourcequota -n dev-team
Or
# kubectl get quota -n dev-team
# kubectl describe resourcequota -n dev-team

Enforcing Quota
in Deployments
To ensure that pods respect the quota, define requests and limits
in pod specifications:
# vim nginx.yaml
apiVersion: v1
kind: Pod
metadata:
name: example-pod
namespace: dev-team
spec:
containers:
- name: my-container
image: nginx
resources:
requests:
cpu: "0.5"
memory: "1Gi"
limits:
cpu: "1"
memory: "2Gi"
# kubectl apply -f nginx.yaml
# kubectl get pods -n dev-team

# kubectl describe resourcequota -n dev-team

Resource Limits
count applies on configmaps, persistentvolumeclaims, pods, replicationcontrollers,
services, services.loadbalancers.
Create a test namespace.
# kubectl create ns test
Quota for count limits :-
# vim object-counts.yaml
apiVersion: v1
kind: ResourceQuota
metadata:
name: object-counts
spec:
hard:
configmaps: "10"
persistentvolumeclaims: "4"
pods: "1"
replicationcontrollers: "20"
secrets: "10"
services: "10"
services.loadbalancers: "2"
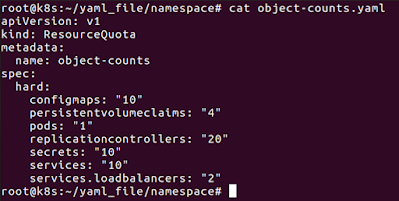
# kubectl apply -f object-counts.yaml -n test
# kubectl describe ns test
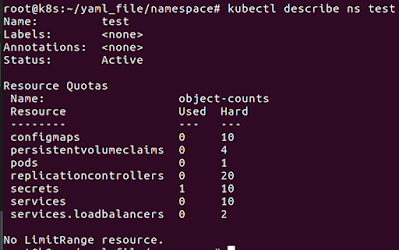
# kubectl get quota
# kubectl apply -f pods.yaml

If creating a
second pod in the test namespace getting an Error because 1 port is limited.
# kubectl apply -f pod2.yaml

How to Delete
the resourcequota?
delete quota :-
# kubectl get quota -n test
# kubectl delete
quota object-counts -n test
How to
edit and update resource quota.
# kubectl
edit resourcequota <resource_quota_name>
-n <Namespace>
# kubectl
edit resourcequota object-counts -n test
Or
# kubectl
get resourcequota object-counts -n test -o yaml > object-counts1.yaml
# update vim
object-counts1.yaml
# kubectl apply -f object-counts1.yaml -n test
Configuring
ResourceQuota for Storage in Kubernetes.
In
Kubernetes, ResourceQuota allows administrators to limit resource usage per namespace.
This is useful to prevent excessive storage consumption and ensure fair
resource allocation.
Step 1:
Create a ResourceQuota for Storage
# vim storage-quota.yaml
apiVersion:
v1
kind:
ResourceQuota
metadata:
name: storage-quota
namespace: shashi-namespace
spec:
hard:
persistentvolumeclaims: "5"
# Max 5 PVCs allowed
requests.storage: "2Gi"
# Max total requested storage
# kubectl
apply -f storage-quota.yaml
# kubectl
describe resourcequota -n shashi-namespace

1.persistentvolumeclaims:
Limits the number of
PVCs in the namespace.
2.requests.storage:
Restricts total
requested storage (e.g., total PVCs cannot exceed 2Gi).
Test the
Quota with PVCs
# vim pvc.yaml
apiVersion:
v1
kind:
PersistentVolumeClaim
metadata:
name: test-pvc
namespace: shashi-namespace
spec:
accessModes:
- ReadWriteOnce
resources:
requests:
storage: 10Gi #
This exceeds the quota (10Gi)
# kubectl
apply -f pvc.yaml
Error from
server (Forbidden): error when creating "pvc.yaml":
persistentvolumeclaims "test-pvc" is forbidden: exceeded quota:
storage-quota, requested: requests.storage=10Gi, used: requests.storage=0,
limited: requests.storage=2Gi
Request for 1 GB in PVC .

# kubectl apply -f pvc.yaml
# kubectl describe resourcequota -n shashi-namespace

No comments:
Post a Comment