Prerequisites:
1. Launch 2 AWS EC2 Linux instances.
2. Jenkins install both ec2 Linux instances.
3. 22 & 8080 Port allow both ec2 Linux instances.

Configure Jenkins Slave Node:
1. Create user, ssh keys and copy it to authorized_keys.
# sudo useradd jenkins-slave1
# sudo su - jenkins-slave1
# ssh-keygen -t rsa -N "" -f /home/jenkins-slave1/.ssh/id_rsa
# cd .ssh
# cat id_rsa.pub > authorized_keys
# chmod 700 authorized_keys
Copy the slave node’s public key to master node’s known_hosts file.
# sudo mkdir -p /var/lib/jenkins/.ssh
# cd /var/lib/jenkins/.ssh
# cd ..
# sudo chmod 777 .ssh
# cd .ssh
# sudo ssh-keyscan -H SLAVE_NODE_PRIVATE_IP >>/var/lib/jenkins/.ssh/known_hosts
# sudo chown jenkins:jenkins known_hosts
# sudo chmod 700 known_hosts
Configure New Node in Jenkins:
1. Click on Manage Jenkins.
2. Click on Manage Nodes and Clouds

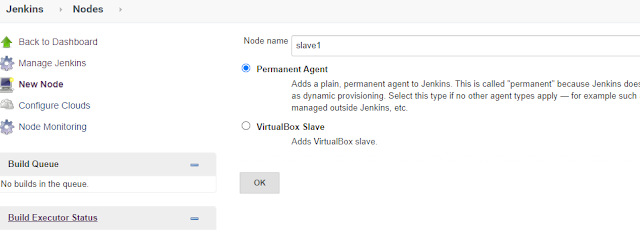
3. Click on New Node
4. Enter Node name and select Permanent Agent. Click OK
5. Enter node configuration details as shown below.

6. In Credentials, Click Add -> Jenkins
7. In Add Credentials, choose kind as “SSH Username with private key”
8. In Username field, enter the same username which we created on Slave Node – jenkins-slave1
9. In Private Key, choose Enter directly.

10. Go to Slave EC2 server and copy the private key.
# sudo su - jenkins-slave1
# cd .ssh
# more id_rsa
11. Paste the key in the Private key field in Jenkins.
12. Click on Add.
13. In the Node Configuration page choose the new credential.
14. Click on Save.

Master node side add a label.

Create two Jobs for testing.
first_project jobs will run on the master node.


second_project jobs will run on the slave node.


No comments:
Post a Comment